

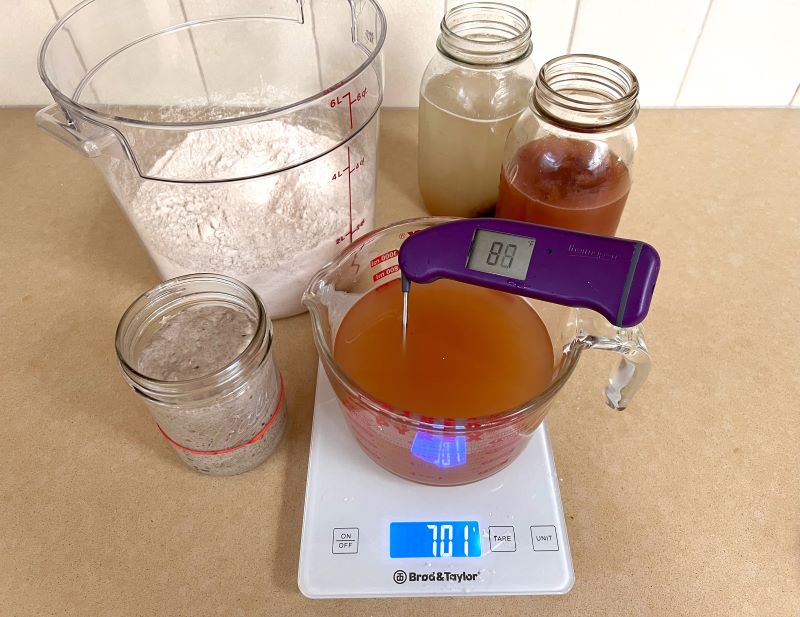
Main dough autolyse (top photo)Preferment (below) Wild Yeast Water baking is simpler than sourdough! Why?…


FAQs for Wild Yeast Water
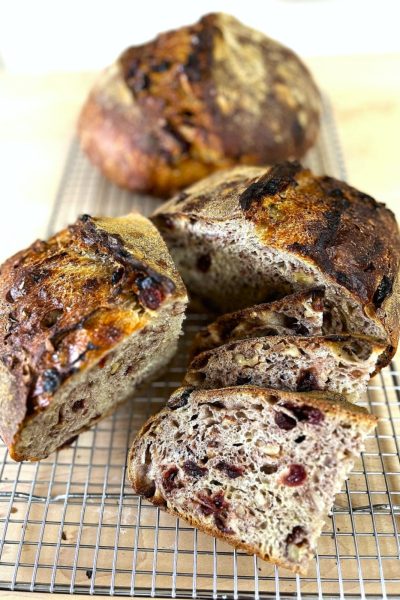
Naturally leavened Wild Yeast Water bread.
No feeding, no discard, and no dry yeast!
Making Wild Yeast Water
What is Wild Yeast Water (WYW) vs Sourdough Starter (SD)
Wild Yeast Water is natural yeast captured in liquid form. Sourdough starter is wild yeast captured in water with flour which develops lactic acid bacteria.
Wild Yeast Water does not have the lactic acid bacteria of sourdough starter, but once it mixes with flour the yeasty water raises bread dough.
How is Wild Yeast Water made?
This liquid yeast magic is made with fruit + water + time. Most of my bread recipes use yeast water made from dried dates, cherries, or raisins. Step by step instructions for making your first jar of wild yeast water are here.
Wild Yeast Water (WYW or YW) can also be made with fresh herbs and edible flowers. Send me a message to learn about this method.
How long does Wild Yeast Water (WYW) stay active after it’s made?
Yeast water stays active for weeks to months when kept properly refrigerated.
Where is the best place to store WYW?
The coldest part of the refrigerator with most consistent temperature, which is usually at the back. The refrigerator door has too much temperature fluctuation, causing the yeast cells to reduce their activity faster.
Does anything need to be done with WYW between bakes?
No! That is the beauty of wild yeast water compared to sourdough starter. Yeast water does not need feeding or discard between uses. It waits patiently in the refrigerator until the next use. Like a no-maintenance cactus!
Does WYW need to be fed before using?
No! This is another beauty of WYW compared to sourdough starter. The water is ready for making a straight dough (one step like my KISS Overnight Wild Yeast Water Bread), or to make a preferment/levain dough (like this recipe, as long as the water is bubbly and has a little gas release when lightly shaken before opening. IF the water does not have bubbly action after refrigerating for several weeks or months, then refresh per my instructions on how to make and maintain WYW.
How often does yeast water need to be refreshed?
Yeast water only needs refreshing to replenish the supply of water, OR, if it appears to have lost bubbly activity which could happen after 3-4 months. The time varies from 6 weeks to 6 months depending on the fruit used and refrigeration temperature.
Can I change to a different fruit when refreshing yeast water?
Yes! Once the water is made it can be refreshed with any dried fruit, though I typically stay with the fruit it was made with. I usually make the first fermentation with dark raisins, dates, or dried cherries. Sulfured golden raisins can be slow to ferment, so are not recommended. Dried cherries usually ferment yeast water fastest, probably because they have a lower PH (more tart) than the other fruits.
Does yeast water made with different fruits change the bread flavor?
No. I have not found a difference in bread flavor using either raisin, date, or cherry water.
Are there other ingredients that can make wild yeast water?
Yes! I have made yeast water with fresh herbs and edible flowers. Lavender flowers make a very floral water that imparts lavender flavor in the bread. It makes delightful lavender sticky buns! Herbs I’ve tested like thyme and rosemary do not impart much flavor, but the water smells good and bakes nice bread!
Can honey be used in place of sugar to make and refresh yeast water?
Yes! I’ve used honey with the lavender and edible flower waters.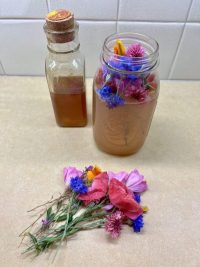
Send me a message to learn more about making WYW with edible flowers!
Baking bread with Wild Yeast Water
How do I know if my WYW is active?
If the water has zero fizz when shaken, or does not have a beer-like alcoholic scent, it may need refreshing. Try refreshing per these instructions on how to maintain WYW, before tossing the water out! An overnight test to confirm WYW activity can be done by making a preferment with 100g WYW and 100g flour (preferably half whole wheat or rye plus bread flour) If it doubles or triples in 8-12 hours at 75F then it is active. If the preferment does not rise, the WYW is not active. Refreshing takes 2-3 days, starting over takes 5-7 days.
What is the best temperature range for WYW fermentation?
75-80F (24-26C) is the ideal temperature range for initial WYW fermentation, for making preferment, and for bread dough. 82-85F (27C-29C) can work for making WYW, but watch carefully as the fruit might disintegrate and over a long time could destroy the yeast in the water. Bread dough can over-proof above 85F.
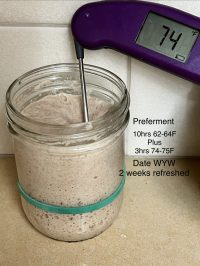
What is the best temperature for making WYW preferment?
The photo on the left shows preferment that more than doubled at 68F with newly refreshed WYW.
The two photos on the right show a 2-week WYW at 64F that barely doubled in 10hrs. An additional 3 hours at 74F brought that same jar of preferment to full fermentation. 75-80F is still the ideal temperature.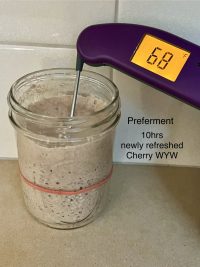

What is different about using WYW vs Sourdough Starter?
Once a jar of WYW is made, it does not need feeding or discard to remain active. It is ready to use in a straight dough (directly mixing with all the flour) like this Overnight No-Knead recipe or by making a preferment or levain (like the mixture of sourdough starter and flour). Like this recipe I call 2.0 Artisan Bread that uses 100g yeast water with 100g flour to make a preferment.
Does WYW make a sour-flavor bread like sourdough?
Yeast water bread is less tangy than a traditional sourdough bread. However, a few techniques can enhance the flavor of WYW bread. For instance:
1) A longer cold fermentation (proofing) can enhance sour flavor. It’s not unusual for a cold proof to be as long as 36hours at 37F(3C). (Do not do a long cold proof if you suspect the dough is already over-proofed).
2) Increasing the percentage of whole grains, type of grains, and including 5-10% rye flour with whole grains will add an earthy, nutty flavor that can either replace or enhance perception of sour tanginess.
What techniques enhance flavor in WYW breads?
1) More whole grain flours vs white flour will add flavor to WYW breads
2) Cold-proofing (also called retarding) WYW dough at 37-39F (3-4C) for 12-36 hours increases flavor because the yeast slowly breaks down some of the starches resulting in enhanced grain flavor.
3) Refrigerating preferment up to 5 days, may provide a subtle tangy flavor, which I’ve found most noticeable when using it in my seeded crackers recipe.
4) Longer, lower temperature bulk proofing can increase sour flavor. Try 68-70F but be sure to allow a lot longer proof time. My straight dough over-night recipes are examples of this.
How long does yeast water preferment keep once it is made?
Preferment (also called levain) keeps up to 5 days refrigerated. My bread dough tests with 5-day preferment have been successful. Longer refrigeration would eventually reduce the yeast activity and be like an old sourdough starter that needs refreshing. I like to keep a jar of WYW in the refrigerator for spur of the moment baking! If it’s there for 5 or 6 days and I’m not up for bread baking, then I quickly make a batch of seeded crackers.
Is additional yeast water used in dough with a preferment?
Additional yeast water can be used to enhance the rise of a dough that uses a WYW preferment, however it is not always necessary. For example, my 2.0 Artisan Bread recipe uses both a preferment and yeast water though my focaccia recipe only calls for yeast water. If your yeast water has a little less fizz than when it was first made, or if a preferment takes longer than 12 hours to double at 75F, it may help to add more YW to the main dough, but more doesn’t necessarily improve rising.
How many loaves of bread does one quart jar of yeast water make?
One quart jar holds about 600 grams of WYW. Depending on the recipe used, each 500g loaf (or focaccia) uses 50-100 grams yeast water depending on the recipe. Therefore, 600 grams of WYW can typically make 5-10 loaves of bread.
Always save about 100g yeast water in the jar to refresh, rather than needing to start a new WYW from scratch.
Can I replace sourdough starter with WYW in my favorite recipes?
Yes, I’m glad you asked! I have a post dedicated to how to convert sourdough recipes to wild yeast water. I do this all the time and it works great. Think of the WYW levain as sourdough starter. There may be a little less tang if you’re used to a very sour sourdough starter, but you can adjust that with my suggestion above on enhancing WYW bread flavor.
WYW Bread Doughs
How is percent hydration and flour calculated in my recipes?
The mathematical calculation for % hydration is total water divided by total flour. If preferment/levain is used, I include that as 50% water and 50% flour because it was made with equal weights flour and water. Some recipes do not include the starter or WYW preferment in the calculations. Most of my recipes are based on 1000g or 500g total flour, which keeps the calculations simple.
Hydration % Example:
Preferment: 100g WYW + 100g flour
Main dough: 700g H2O + 900g flour
Hydration= 800g water ÷ 1000g flour = 80% hydration
Flour % Example:
Bread flour: 800g (includes preferment if using)
Whole Wheat flour: 200g
Bread flour %: 800g ÷ 1000g = 80%
Whole wheat %: 200g ÷ 1000g = 20%
What are reasons to increase or decrease dough hydration?
This is the magic question! Dough hydration is not a perfect recipe because flours will vary in hygroscopicity, or dryness, based on brand, milling style, time of year, type of whole wheat. Typically, if replacing 20% white bread flour with 20% whole wheat flour, start by increasing water 10-15g per 100g whole wheat, to account for whole wheat being more ‘thirsty’ than white flour. Note: some ancient grains like Einkorn can be an exception in that it looks like whole wheat but acts more like a white bread flour and may not need additional water. The only way to know for sure is to test a batch keeping notes for future bakes.
How is dough mixed in a stand mixer?
In a 5-quart KitchenAid, for example, let the dough hook* do all the hand work. Mix the autolyse just until all the dry flour is moistened. When mixing the main dough, use low speed or #2 for about 5 minutes until dough clumps around hook and pulls clean from sides of the bowl. Let rest 10 minutes. Mix 5 more minutes.
Salt can be added after the second 5 minute mixing, if not previously added. If the dough feels like it could hold more moisture, add 10-25g of water with the salt to help dissolve it. Mix 3-5 more minutes. This is called the bassinage method which allows for a little extra water after the gluten has developed in the main dough. Bassinage can improve dough strength, elasticity, and more open crumb. (I have not made a comparison with and without bassinage, but I like the ability to add more water at this point. It’s surprising how well it can mix in especially with the spiral dough hook).
*A spiral dough hook is well worth the investment compared to the standard KitchenAid dough hook, because the spiral is larger and fully wraps the dough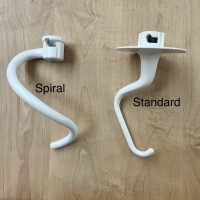
How to mix dough by hand
First, be sure to use a large enough container so there is space to work the flour and water together. Start with a large spoon to mix the flour and water (or hands) until all the flour is completely moistened. Cover and let rest 15 minutes for white flour, or up to two hours if 20-50% whole grain flour. This is called autolyse. Some recipes autolyse up to 12 hours at 62-68F, which can make a softer crumb and reduce need for as much folding.
Why is dough cold proofed before baking?
A reason for cold proofing is to allow the dough a slow second rise. This adds volume, flavor, and will make the dough easier to score because it is cold. It is not mandatory to cold proof, especially if the dough has significantly over-proofed. In that case, it can be best to bake immediately after shaping.
How long can dough cold proof before baking?
Ideally a shaped dough is refrigerated for 12-16hrs, but there is flexibility. It can also be refrigerated (37F) for up to 40 hours resulting in an excellent crumb. Sometimes if the dough is refrigerated too long and is not strong enough, it will start to collapse. It’s possible it will recover when baked, but it may not be an ideal crumb.
Cold proofing also allows you flexibility with your baking time: no time to bake immediately? Refrigerate and bake later. Remember, there is flexibility in this timing – don’t let bread dough run your life!
Are folds needed if dough is mixed in a stand mixer?
This can vary by how much you like to handle the dough, and your schedule! I’ve heard some home bakers do not do further folds when mixed by machine. I like to give the dough 1-2 more folds during the first 90 minutes, but I have not done a side-by-side to see if there is significant difference with or without the folds.
Would there be benefit to add active dry yeast to WYW dough?
I have tried adding active dry yeast to my WYW dough though not found a noticeable benefit. I have seen recipes that add a very small amount (1/8-1/4tsp/1000g flour) of active dry yeast to sourdoughs to improve rise and crumb. If you try it, let me know what you think!

Leave a Reply