

January is National Baking Month, so even though I bake year-round (including microwave English Muffin…


Overnight No-Knead Yeast Water Bread

I’ve converted the popular No-Knead Bread recipe by Jim Lahey of Sullivan Street Bakery from active dry yeast to wild yeast water. Why did I convert to yeast water? Because long fermentation with yeast water amps the flavor and crumb to a more bakery style loaf –in my opinion, and I hope yours too when you try it!
Click here for how to make your first jar of Yeast Water
If you happen to also be a sourdough or levain baker, the winning difference with yeast water is that it’s always ready for baking without feeding between bakes. Yeast water keeps refrigerated for months, always ready to use. Just replenish the water according to my instructions.
And when you replenish the water, save the fruit! See my Apple Date Snack Cake for a one bowl cake recipe.
There are many ways to ‘slice bread’, and many recipes to choose from. I hope this recipe helps you discover a best method that works for you! Send pictures of your bread or ask me questions along the way. I love to talk bread!
*I am not paid to mention my favorite enamel cast iron Dutch oven by Amazon Basics but I highly recommend it! To control temperature for faster or slower proofing, I use
affiliate link

The high capacity bakinig scale
I use all day long in my kitchen!


Easiest Overnight No-Knead Yeast Water Bread
Yeast water dough may take about 25% longer to proof than dough made with active dry yeast, depending on strength of the water and proofing temperature. Longer fermentation can contribute to increased flavor and for some people enhanced digestibility of the wheat. (If you don't have yeast water -yet! – see instructions in notes below for dry yeast).Instructions for making Wild Yeast Water How to Make Wild Yeast Water – Rosemary Mark The initial process takes 5-6 days then keeps refrigerated several months, always ready to use. The No Knead process: stir, proof for 18-24 hours at about 70F, shape, bake! Remember, the warmer the room the quicker the rise.I recommend measuring in grams as cup measurements vary greatly. I use this scale because it holds enough weight including bowls and ingredients: Brod and Taylor High Capacity Baking Scale High Capacity Baking Scale – Brod & Taylor (brodandtaylor.com)
Servings: 1 appx 1.5lb loaf
Equipment
- cast iron Dutch Oven, 3.5-5 quart size
- parchment paper
Ingredients
- 420 grams all-purpose or bread flour (about 3cups) AP flour (bleached or unbleached), produces a softer crumb than higher protein bread flour.
- 90 grams whole wheat flour (about 3/4cup) or spelt or einkorn flour
- 10 grams kosher salt (1Tbsp) or table salt (2tsp)
- 300 grams/ml tap water (about 1-3/4c) If you are less experienced with bread doughs, try the first time with 275g water for a slightly firmer dough that's easier to shape.
- 100 grams/ml Yeast Water (scant 7 Tbsp) shake before measuring, add to the tap water and warm to 95-100F. See note for substituting dry yeast
For lemon-rosemary bread
- 1 tbsp lemon zest, appx zest of 1 lemon
- 2 tsp. very finely minced fresh rosemary
Instructions
- Mix dry ingredients in a large bowl. Add lemon zest and rosemary if using.
- Stir in warmed (95-100F) water and yeast water (if using instead of dry yeast) with a wooden spoon. Switch to a plastic scraper if you have one and continue mixing and turning just until dough is evenly moistened and pulls away from sides of the bowl. It’s not necessary to stir vigorously, just enough so the flour is mixed in.Note: warming the water and yeast water helps speed the proofing process but is not necessary.
- Cover bowl with plastic wrap (a plastic shower cap works great!) and let stand 15-30 minutes. Now give the dough a slap and fold about 12 times until the dough gets smooth and feels a little taught. If the dough doesn't smooth out, be sure you are folding completely over the ball of dough, not part way across, before starting the next stretch and fold. If you skip the slap and fold you'll still get a great loaf of bread, but folding helps stretch the gluten and improves the holes, or 'crumb'.
- Cover bowl with plastic and let stand at warm room temperature (at least 70F up to 78F) 18-24 hours until the dough is at least doubled in volume. It may get very bubbly.
- The dough will look like this at 1 hour. It needs time which will vary by room temp. For a warm space, try the oven with the light on –do not accidentally turn on the oven! My oven reached 70F in about 2 hours. I do not leave the light on longer than 3 hours as it can reach over 90F which is too warm.

- Keep the faith! Even at 6 hours it will have only slightly risen.

- When you wake up in the morning it may look like this! In this photo the dough is made with 400g total water so it is a looser dough.

- Or it may look like this when made with 375g total water. Either will work, promise!

- Leave the dough in the bowl. Now gently stir dough down with scraper or spatula and fold over in 90 degree turns several times. Using hands or scraper, firmly push and tuck edges under to shape dough into a ball. with a taught surface. Cover the bowl and rest dough for 30-60 minutes. Look for small bubbles forming just beneath the dough surface which should feel soft to the touch and slightly risen.
- OPTIONAL final shaping: After the 30-60 minutes of rest, a final shaping can be done which can improve the interior crumb. (But leaving in the bowl means no messy counter and will still produce a good loaf). Place pre-shaped ball of dough on a lightly floured surface. Tuck a plastic or metal dough scraper under the ball of dough at approximately 4 o'clock (or 8 o'clock if left-handed) at 45-degree angle. Scoop around the dough to just past 12 o'clock while simultaneously pulling the dough towards you, using the opposite hand to help round into a ball. Do this 3-5 times until the dough surface feels more taught.
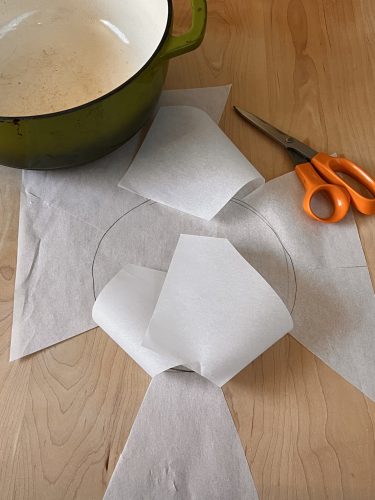
- To turn into baking dish: Cut angles into a piece of parchment paper to the circumference of the Dutch oven. NOTE: parchment is critical to preventing sticking with the cold bake method. If using the preheat bake method, parchment can be omitted and dusting the bottom of the dough with flour or rice flour is sufficient.

- Place the parchment paper over the bowl and a plate or rimless tray over the parchment.
- Flip over so the dough is now on top of the parchment on the tray or plate. Then slide into the preheated or cold Dutch oven and follow directions below.


Baking options: Preheat or Cold Bake – see note below about oven temps
- The theory on super-heating the baking pot is to provide an initial burst of steam heat to increase the dough's oven-spring. Managing the hot pot can be a little tricky. I have excellent results with the cold bake and like the electricity savings.
- PREHEAT BAKE METHOD: While dough is resting, preheat a heavy Dutch oven to 500°F (475°F convection). NOTE: The pan must be a glazed pan that can withstand 500°F or a cast iron Dutch oven or skillet. Do not place empty pan in preheated oven as it can craze enamel surface. Allow at least 30 minutes for pan and oven to super-heat. My oven takes 45 minutes.
- Carefully remove the hot pan from the oven, leaving a hot pad on the lid so as not to accidently grab with bare hand. Unwrap dough, quickly slide dough top side down into the preheated pan. Cover with lid or loosely cover container with foil. (This step can also be done by leaving pan on oven rack and pulling out.)
- Reduce oven to 475°F (450°F convection). Cover pan with lid or foil. Bake 25 minutes. Dough will rise and start to brown.Remove lid or foil and continue to bake until very dark brown; additional 15-20 minutes. Immediately remove bread from pan and cool on a wire rack. If the crust doesn't feel crisp, return the loaf to the oven rack for 5-7 minutes.
- COLD BAKE METHOD: These directions are from Elaine Boddy https://foodbodsourdough.com/ to bake from cold start oven. Transfer dough on parchment paper to unheated Dutch oven. Place in cold oven. Set oven to 450°F (425°F convection). Bake bread covered for 50 minutes. Uncover and bake additional 10 minutes or until well browned. Turn out immediately onto cooling rack. I prefer a well-browned crust so sometimes I place the loaf on the oven rack to bake additional 5-7 minutes.
Notes
*Wild Yeast Water can be produced in about 5 days with raisins or dates and water. Instructions here: How to Make Wild Yeast Water – Rosemary Mark
Information about Wild Yeast Water can be found in this Facebook group.
To replace Yeast Water in this recipe with active dry yeast, add 1/4 teaspoon instant or active dry yeast and increase tap water to 400grams (about 1-3/4cups)
For a speedy version using active dry yeast, the proof time will be 3-4 hours vs 18-24hrs. There will be less flavor development but it will still be a satisfying fresh loaf. Use hot water (115-120F) and add 1/4 teaspoon red wine vinegar, per directions in video by Mark Bittman. See my speedy version HERE.
Due to variations in ovens and cookware, experiment with temperatures between 425°F and 475°F for the covered and uncovered bake times to find your best browning and interior doneness.
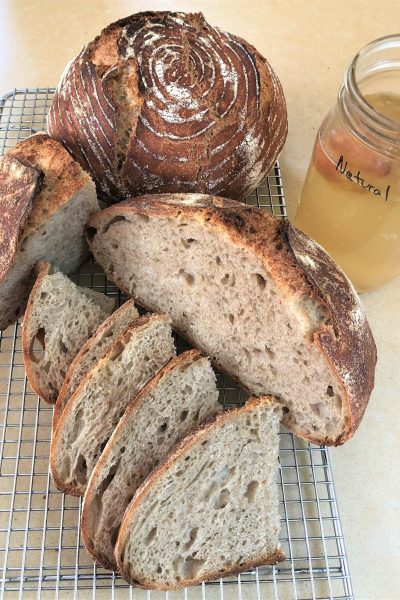
Recipe adaptation and photo by Rosemary Mark

Very nice tasting No Knead bread. Used Fresh Milled Khorazan & King Arthur AP. Fantastic overnight rise at 77F in proofing box. Baked, using cold start method, in oval clay baker but only got a moderate oven spring [about 1.5″ above rim of clay baker]. Even dropping the hydration from 78% {converted everything to Bakers%} to 75% was IMO too wet. 75% is usually my upper limit for No Knead breads.
My WYW was from frozen Wild Grapes and Blackberries from my yard and it took off like gang busters in only 4 days while kept at 77F . That may have been the reason for the lack of oven spring so I’ll try this again with a more mature WYW.
Love the detail you’ve gone into on your website. One of the very few which actually covers the long term maintenance of the WYW. Thank you!
Thank you so much for the detailed report! How cool to make WYW with your home-grown fruit. I’ve not made with fresh fruit, so I really appreciate hearing about yours. It’s possible after a 2nd feeding your fruit water will be stronger. Also, flours vary in their thirst, so Khorazan may need less water, but I agree the No Knead is easier to work with at lower hydration (correction: previously wrote lower temp), plus it may get more oven spring at lower hydration. I’d love to hear how your future bakes work out. Try the overnight Focaccia too — I find it is very forgiving to wet/dry ratios.
Update: Using the now more mature WYW and one additional change, I hit exactly what I was looking to accomplish. Much better oven spring and more flavor.
I used the Yudane method which has never once failed to deliver it’s claims. I took all the Fresh Milled Khorasan flour and equal weight in boiling water using the Yudane method. I just let the mixture cool before continuing with the rest of the recipe as you had written it.
The flavor greatly increased which is often lacking using the No-Knead process. Also the Yudane method made the initial dough far less wet and more of a shaggy dough indicative of the No-Knead process. I’d encourage anyone making bread at home to try the Yudane method as it does not require any additional ingredients just 1 additional step but the results are astounding.
Thanks for advocating Yudane with Wild Yeast Water! I have done it with spelt flour but haven’t added to my website, yet! Thanks for the prompt.
For those unfamiliar, it is a method of heating water or milk and mixing with a small portion of the total flour to make a paste that’s added to the main dough. It adds moisture to the dough by super-hydrating the flour so the total dough can hold more water. It’s sometimes called scalding. Yudane is similar to tangzhong, the difference being Tangzhong generally uses higher ratio of water or milk to flour. The process makes a soft crumb and helps extend shelf-life.
Here’s a link about yudane and tangzhong: https://asianinspirations.com.au/food-knowledge/yudane-vs-tangzhong-asian-methods-for-fluffy-bread/#:~:text=Yudane%20and%20Tangzhong%20are%20the,gelatinizes%20into%20your%20base%20dough. Although this refers to Asian-style breads, I’ve used the method successfully in whole grain grain European-style breads (if we are calling the breads a style).
Craig – what percentage or grams of Khorasan and water did you use?
Don’t know if this will format well but here are the Bakers % for everything.
Pre Bkr% Yudane
18.00% Flour Khorasan 110 Gr
21.75% Water 133 Gr
MD Bkr% Main Dough
84.00% Flour AP 512 Gr
34.85% Water 213 Gr
20.00% Wild Yeast Water 122 Gr
2.20% Salt 13 Gr
NOTE: I added a little more water in the Yudane with the Khorasan because Fresh Milled flour is very thirsty and I could feel it could easily accept more water. If not fresh milled, then an equal weight would work.
This is terrific, thanks so much! I’ll try it and report back in the next few weeks. Just to clarify, what are you calling the total hydration percentage? I calculate 75%.
NOTE: Thanks to Google Sheets rounding up, the total flour weight is 102% but the actual weights in grams I showed are correct.
75% is about right for the hydration. Again thanks to Google sheets rounding up I show 76%.
This shows one of the benefits of Yudane as at 76% I’d struggle with a dough being too wet, but this one behaved exactly like a No-Knead shaggy dough should feel like.
NOTE: The total dough weight is a little higher than your recipe but only because I need more dough to fill my clay baker. My final total dough weight was 1104 grams. I believe this is 1.22 times your original dough wt.
My next test will be two fold. In a cold start and hot start Dutch Oven.
Cool! We are calculating the same. Agree, lower hydration is easier to work with, which is why I suggest trying 275g H20 in this recipe https://www.rosemarymark.com/easiest-ever-no-knead-artisan-bread/ I will make a note of it in the KISS recipe too. Looking forward to seeing your comparison of the cold vs hot start. Thanks so much!